Running oTree on Prolific for Beginners

oTree is an open-source, Python-based framework that lets you build Multiplayer strategy games, behavioral experiments, and surveys/quizzes. What I especially like is that entire projects can be saved in their raw code form, being easily shared, reproduced, and modified.
Despite its extreme versatility, picking up a new software platform for conducting studies can have a steep learning curve. I personally struggle quite a lot to get the pieces fitting together.
One of the many hurdles I have faced in my oTree journey is getting my project properly onto a server and getting it implemented in Prolific.
This guide is designed for people like me: those just getting into programming, with simple things being harder than they need to be. What follows is a step-by-step instruction to get you from only running your project in localhost to having it be accessible to participants on Prolific.
Some things (like updating participant payoffs based on in-study decisions), are beyond my current knowledge and not included here. My hope is to provide updates to this post as I become more knowledgeable.
Useful Resources
I am far from qualified in giving advice on topics of software. Better resources and smarter people can be found at the oTree docs, the oTree Google groups forum, or the oTree discord channel.
Special thanks to Chris Wickens for being active not just in the development of oTree, but in responding to the many questions posed by the community.
- I’d also recommend checking out oTree’s example code repository if you’re in the early stages of working out how to use oTree. You can see a lot of examples of functions in different contexts, which I find helpful for learning (and stealing)
I’m also indebted to those that have posted video tutorials on using oTree:
Assumptions
I don’t know whether these assumptions are a necessary part of being able to follow this workflow, but I do know I got it working in this environment
-
Have your project set up in PyCharm (free license available for students and academics)
-
Have a functioning, multi-app otree project
- This guide might be limited to one-sided (i.e., non-partnered) studies, check accordingly
-
Have otree up-to-date to your preferences
-
pip install otree- to install otree lite (aka. Otree 5 – not dependent on Django)
-
If you would like to guarantee that you stay on version 3.x, use this command next time you upgrade:
pip3 install -U "otree\<5"(https://groups.google.com/g/otree/c/D5TZseoELN0/m/eLLw1gTFBAAJ)
-
-
You wish to connect heroku through github (instead of using otreehub)
Otree Side
How to integrate Prolific IDs in study
Identifying and storing Prolific IDs are necessary for making sure that participants are paid properly (e.g., making sure an ID isn’t seen twice in the study, or being able to confirm whether an ID provided valid responses)
Working with Prolific IDs in oTree is accomplished through configuring a room and the study url
- Go to your
settings.pyand setROOMSwith your desired name (used in url) anddisplay_name
For example:
ROOMS = [
    dict(
        name='your_study',
        display_name='your_study',
        # participant_label_file='_rooms/your_study.txt',
        # use_secure_urls=True,
    ),
    dict(
        name='your_prolific_study',
        display_name='your_prolific_study',
        # participant_label_file='_rooms/your_study.txt',
        # use_secure_urls=True,
    ),
]
-
As seen below, on one of your early apps, assign the location (
player), and method (before_next_page) for extractingparticipant.label- Try one page after consent so you don’t extract unnecessary info
class Player(BasePlayer):
    prolific_id = models.StringField(default=str(" "))


class Demographics(Page):
    form_model = 'player'
    form_fields = ['age', 'gender', 'education', "income"]

    @staticmethod
    def before_next_page(self, timeout_happened):
        self.prolific_id = self.participant.label
pass
- Remove/comment out the participant label file (if you haven’t already)
The participant.label value (which will be functionally the same as participant_label) will be populated from the participant’s Prolific ID, which will be explained in section 4 – Prolific Side.
Before this step, you’ll need to change the link from local host to wherever you’re hosting the link (e.g., Heroku – explained below)
Linking to completion page
Recommended practice in prolific seems to be re-directing participants back to the Prolific website for their completion code. This can be specified in the session configs like so:
- Update
completionlinkfield insession_configswith a link to a prolific “completed submission” site with your custom completion code (use a placeholder link, and replace once you have a study created in prolific)
SESSION_CONFIGS = [
dict(name='your_prolific_study',
     app_sequence=['consent', 'intro', 'your_experiment',
     'questionnaires', 'payment_info'],
     num_demo_participants=1,
     completionlink=
       'https://app.prolific.co/submissions/complete?cc=11111111',
),
]
For better generality, I’d recommend assigning your completionlink variable to a javascript variable, as below:
- In
initfor your last app, configure a completion link for your very last page
class PaymentInfo(Page):
    form_model = 'player'

    def is_displayed(player):
        participant = player.participant
        return participant.consent == True

    @staticmethod
    def js_vars(player):
        return dict(
            completionlink=
              player.subsession.session.config['completionlink']
        )
    pass
- In your targeted payment html page, pass submission link to participants with a JavaScript automatic redirect
<script>
    let completionlink = js_vars.completionlink;

    window.onload = function(){
        window.location.href=completionlink;
    }
</script>
The is_display statement in 5 is useful so that only participants who consent will end up seeing your payment page. This is especially useful if you configure your consent app like below:
BONUS: CONSENT CONFIGURATION
    @staticmethod       # populates a participant
#variable with the respondent's consent status (for use across apps)
    def before_next_page(player: Player, timeout_happened):
        participant = player.participant
        participant.consent = player.consent

    @staticmethod
        # sends nonconsenting participants to the last app
    def app_after_this_page(player, upcoming_apps):
        if not player.consent:
            return upcoming_apps[-1]
note: for this consent piping to work, you’ll also need to go to settings.py and set
PARTICIPANT_FIELDS =['consent']
Heroku Side
Heroku is the major platform for getting your study online.
There are a few ways to connect to heroku – otreehub, github (through Heroku), and the command shell (uses git). Through my personal learning, I became most familiar with the command shell method and GitHub, but I’d also try checking out oTree Hub, which is the recommended method for holding your hand through deployment.
Command shell method
**Click for more/less**
-
Downloading software
-
Download heroku CLI
- https://devcenter.heroku.com/articles/heroku-cli{.uri}
- connects computer to Heroku
-
Git
- https://git-scm.com/downloads{.uri}
- Download default settings
-
-
Create Heroku account
-
Click
create new app -
Create app name (unique)
-
Under
resourcestab-
NOTE: these are paid options, so you should consider sticking to hobby options when first testing
-
Add
postgres-
Select
hobby basic -
Proper postgres/resource configuration will be discussed in implementation section
-
-
-
-
-
Open powershell on main otree folder
- i.e., where you could run your “otree devserver” command
-
commands
Heroku login
# Press any key to open browser

Git init
#makes folder
Git add.
#add files into folder

Git commit
#Put in email and name if prompted

Heroku <git:remote> -a name_of_your_heroku_app

Git push Heroku main

# uploads to Heroku

Heroku run "otree resetdb"

#prepares database to work in otree *needs to be done everytime changes are made to models.py*)
After any otree changes
Git commit -am "your commit message"

Git push Heroku main

Heroku run "otree resetdb"
- Test on Heroku
-
Navigate to Heroku
-
Click
open app -
Click
your_app
-
- Navigate to Powershell to configure security
Heroku config:set OTREE_AUTH_LEVEL=DEMO
#Controls what a user without password can do, In this case, demo

Heroku config:set OTREE_ADMIN_PASSWORD=mypassword
#When accessing admin interface -- require mypassword

OTREE_PRODUCTION=0
#Takes value 1 or 0; If an error, toggles whether participants will see a brief (1) or detailed error message
# left 0 because a full-page error is thrown otherwise
- Create a session
-
Click the
Roomstab in your link -
select
close this roomif a session is active, then restart -
when creating a new session, select the
Session Configthat you wish to test -
input the targeted number of participants for that session
-
select
create
GitHub method
**Click for more/less**
-
Go to your Heroku account, personal link
-
Click
new, thencreate new app -
Create a (unique) app name
-
Click
deploy -
Select GitHub as your deployment method
-
For
app connected to GitHubselect your account and input the name of your app -
Enable
automatic deploys -
Select the branch you’d like to use for your app, and click
deploy -
Click
resourcestab- NOTE: these are paid options, so you should consider sticking to hobby options when first testing
-
Add
postgres-
An open-source relational database management
-
Standard 0 is often fine, but look at other options (e.g., Standard 2 or premium 0, premium 2 based on your needs – better safe than sorry)
-
-
Add
redis- Standing for RE mote DI ctionary S erver: in-memory data structure store, in-memory key–value database
-
Define
dyno-
Set as professional, and maybe add 1 dyno for web, Standard should be enough for most experiments
-
Impacts how long it takes to create sessions
-
-
Click
settingstab, clickreveal configsbutton -
in
keyfield, typeOTREE_AUTH_LEVEL; invaluefield, typeSTUDY; clickadd-
Controls what a user without password can do
-
STUDY: visitors can only access specified app
-
DEMO: Anybody can play a demo version of your game (but not access the full admin interface)
-
-
OTREE_ADMIN_PASSWORD=mypassword- When accessing admin interface, requires
mypassword; prevents participants from accessing sensitive info
- When accessing admin interface, requires
-
OTREE_PRODUCTION=1- Disables debug mode (which provides detailed participant information at bottom of page)
Your resulting link will look like:
https://your_heroku_app.herokuapp.com/room/your_prolific_study
Further testing of Heroku app
- Navigate to Heroku
- Click
open app
- Enter
roomstab again, create session with target config
-
Double check that you’ve removed the participant label file – otherwise you hit a label input page
-
If you want to test how the participant label is handled, keep a participant label file, and add some participant labels
-
Then, you can use a url that specifies a valid participant label using the
?participant_label=argument-
E.g.
https://your_heroku_app.herokuapp.com/room/your_prolific_study?participant_label=id_prolific_test- Or anything, so long as it’s in your participant label file
-
-
Prolific Side
After the past two sections, you should have the means to track Prolific URLs, administer completion links, and host your study outside of your local server. The next major step is to make this hosted URL available and compatible for administration on Prolific.
If you open a new study in Prolific, their interface is very user-friendly in this respect
-
In the section “How to record Prolific IDs,” paste in your Heroku room url
-
Select
I'll use URL parameters
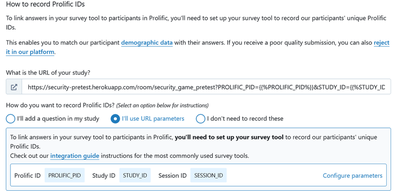
-
Change the url parameters in prolific from
PROLIFIC_PIDtoparticipant_labelaccordingly if following this guide verbatim.- I kept participant_label because it passes in otree by default to participant.label, and I can’t be bothered to work out the translation
link provided through Prolific by default (do not use): https://your_heroku_app.herokuapp.com/room/your_prolific_study?PROLIFIC_PID={{%PROLIFIC_PID%}}
link used in this outline:
https://your_heroku_app.herokuapp.com/room/your_prolific_study?participant_label={{%PROLIFIC_PID%}}
If you are using a URL redirect for study completion, prolific will generate a new one for you.
- Copy the generated URL and replace the input for
completionlinkinsession_config
- E.g.
https://app.prolific.co/submissions/complete?cc=1A1A1111
Testing prolific URL
After configuring your URL (assuming functioning and open Heroku app),
-
Save the draft study,
-
Preview it
- Click on open study link

-
Click through until the page that records
participant_label -
In the admin page, check back on the room, and you should see in the recorded data (in this case,
PROLIFIC_PIDin prolific was passed toparticipant_label, which was then assigned toplayer.prolific_id)

Final Implementation
After you first deploy an otree app on Heroku, it will remain on the original oTree version upon deployment, even after redeploying, or restarting dynos, redis, and postgres.
Double checks
-
Password protect the admin. (prevents participants from accessing sensitive data) https://otree.readthedocs.io/en/latest/server/heroku.html#server-performance
-
Disable debug (set
OTREE_PRODUCTIONserver-side).
Voila! you should be good to go; please use your new-found computer powers for good.
This started as a personal guide for my own quality assurance, so likely is missing information. Don’t hesitate to reach out or comment with any contributions.

Other Info
ON PARTICIPANT LABELS
Usually, if you are using participant labels, you need a participant_label_file which is a relative (or absolute) path to a text file with the participant labels. It should contain one participant label per line.
ON NUMBER OF PARTICIPANTS
“in praxis oTree’s session size is limited by the fact that oTree does not utilise multiple CPU cores” If participants play at different times then that will be better. Think of it like road traffic. Congestion happens when everyone plays at once. Using multiple rooms or multiple sessions doesn’t make a difference.
oTree Hub also has a performance analysis feature which can be very useful in troubleshooting slowdowns.
SESSION OVERLOAD
The most demanding sessions are the ones with a combination of (1) many rounds, (2) players spending just a few seconds on each page, and (3) many players playing concurrently, because these sessions have a high number of page requests per second, which can overload the server. Consider adapting these games to use Live pages, which will result in much faster performance. Live pages use the web dyno.
• With the higher dyno tiers, Heroku provides a “Metrics” tab. Look at “Dyno load”. If users are experiencing slow page load times and your your dyno load stays above 1, then you should get a faster dyno. (But don’t run more than 1 web dyno.)
• If your dyno load stays under 1 but page load times are still slow, the bottleneck might be something else like your Postgres database.
DIFFERENCES FROM MTURK
-
From oTree’s admin interface, you publish your session to MTurk.
-
Workers on Mechanical Turk participate in your session.
-
From oTree’s admin interface, you send each participant their participation fee and bonus (payoff).
BROWSER BOTS
https://otree.readthedocs.io/en/latest/bots.html Browser bots are useful for stress-testing an app
https://docs.cloud.sdu.dk/Apps/otree.html
Tests of the project apps can be launched by adding ‘use_browser_bots’: True to the respective session configuration in settings.py and using the option test –export. The –export flag is added to export the data generated by the bots to a CSV file stored in oTree’s project directory. The user needs to choose the directory name.
In order to simulate the app in a more realistic way, instead of using the test –export command, one can run the server and create a session. The pages will auto-play with browser bots once the start links are accessed.
ROOMS AND SESSIONS
https://otree.readthedocs.io/ja/latest/rooms.html#rooms)
Rooms are necessary for permanent links that are used in real studies
Rooms vs. sessions - If you want to prevent the same person from playing twice, use rooms
Rooms provide:
-
Links that you can assign to participants or lab computers, which stay constant across sessions
-
A “waiting room” that lets you see which participants are currently waiting to start a session.
-
Short links that are easy for participants to type, good for quick live demos.
- Room URLs are designed to be reused across sessions
sessions: Participants can join after the session has been created, as long as there are spots remaining.
NUMBER OF DATABASE CONNECTIONS
https://groups.google.com/g/otree/c/1aYV-JY5l2Y/m/_BiyB5WwBAAJ - The number of database connections is not related to the number of participants. Rather, it is related to the number of server processes. In the simplest setup, each process has 1 database connection. Now that oTree runs in a single main process, it uses fewer connections than before, when there were 3 processes that used connection pooling which further complicates things.
- In reality, there may be a few more connections active. For example there is actually a second process that runs a task queue. I haven’t confirmed this but I would expect that the new version should only use like 5 or fewer connections even when there are many participants.
RECORDING TIME SPENT ON PAGE
Knowing how much time participants spend on each page is very useful for many reasons:
- Calibrating payment
- Detecting problematic observations
- Projecting how long a module of a study will be
My first attempt was to run Javascript on all of my pages, and kick the values back to player objects. This worked fine until I realized that page errors reset the timer. Clearly produces underestimates.
The folks at oTree have written a script for this already, and you can download it directly here:
https://groups.google.com/g/otree/c/NHBISjrnlxo/m/xEEDMKsQDQAJ
For the command python pagetimes.py infile.csv outfile.cs,
You run in the terminal.
All you need to do is:
-
Download the pagetimes.py file to your project directory
-
Download the “infile” .csv file from oTree’s “data' tab (at the bottom of the screen) to an appropriate location
-
run the command in your terminal
As best practice, I wouldn’t download the file to your project directory, in case it’s a public repository, thus revealing potentially identifying information. For instance, I might do the following: python pagetimes.py C:\Users\dalla\Desktop\infile.csv C:\Users\dalla\Desktop\outfile.csv
Other resources
Dallas Novakowski, Ph.D.
I am a behavioral scientist interested in leveraging rigorous consumer research and equitable partnerships to help people and organizations make the decisions that are best aligned with their values.